Sunday, December 4, 2016

Bhutan - Nov 2016

Nov 27 - Dec 2, 2016

This is a retrospective post. I wrote this everyday during my trip whenever I got time. Found this in my laptop and posting it here so that it doesn't get lost. I want to add a brief note on how this trip got planned. It wasn't a lot of planning as such. I am not sure how the thought of Bhutan came to my mind. I think it was after I decided that I wanted to take a small vacation before, after or within my India vacation. The main criteria was to look for a place where I don't have to do much planning. Bhutan fit well in it as Indians don't need a visa and I got references for it through my work travel group. All planning was done over emails with Dorji Gyeltshen from Smile Bhutan. A number of Googlers had toured Bhutan with him so I blindly trusted him and the trip was indeed very well organized.

Day 1:
We started from Delhi and landed at the Paro airport around 2:30pm. This is a unique landing. The plane took couple of turns to get into the valley avoiding touching the mountains and the homes nearby and landed in the backyard of the airport building which did not look like a usual airport. It was as if the plane landed in the backyard of the house. Immigration was very quick and then we met our tour guide for the next 5 days - Dorji and the driver Shiring. He greeted us in a traditional way with a bhutanese white silk scarf.


We then headed towards Thimphu. We stopped in between to see the point where River Paro and Thimphu meet. We also saw the 3 different types of stupas in Bhutan - Nepalese, Tibet and bhutanese style.


We then headed straight to Thimphu. During our drive talked with the guide about Bhutan and its history etc. After reaching Thimphu, we checked into the Hotel - hotel Taktsang. Not a super luxurious hotel but had basics. We then ordered our dinner to be had later and headed towards the Chorten Lam - a memorial built for a king. There was a special 10 day prayer going on - usually organized by monasteries. There were mantra cylinders which have thousands of mantras written covered with a metal cylinder which also has mantras carved on it. We rotated the mantra cylinders as they say if you rotate it once, you basically chanted the thousands of mantras written inside the metal cylinder.


After taking a round of the memorial we saw that a monk was giving ‘holy water’ (charanaamrat) to people, we obviously got there to get some holy water with blessings. Our guide was telling us about the holy water and in return we became his guide and told him about our Indian culture and our holy water (charanaamrat). He mentioned that buddhism in Bhutan and hinduism have a lot of common gods - Ganesha, Shiva to name a few (can’t remember the bhutanese names of them).


We then headed towards the main Thimphu market - Norzin Lam. Its just a street. It felt a lot like the Bhutani market on the Nainital flats but just on one straight street. Interestingly Thimphu has only one traffic signal (I didn’t find the signal but there was a square with a traffic police) of Bhutan. Bhutan apparently has no traffic lights!


After getting back to the hotel we had some masala chai and then took some rest in the room before dinner and also planned for the next day to see what we can suggest more to our guide.


Day 2:
Today we are going to Punakha Valley. After having breakfast at the hotel, we headed towards Punakha at around 8:30am. Our first stop was Dochula pass. We saw the monastery there which was created when Bhutan decided to fight with Bodo and Ulfa militants. Weather was great but we could not see the himalayan range due to clouds. We also saw the 108 stupas on the other side of the road. It was beautiful.
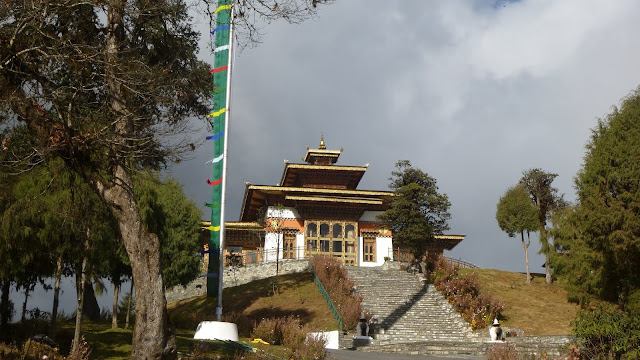


We then headed straight to Punakha valley. After reaching Punakha, our first spot was Chimi Lhakhang, a buddhist monastery dedicated to Drukpa Keenly the divine madman. We took a short 30 min hike to the temple. It is also known as the temple of fertility and people come here with a wish for child. Our guide had got pictures of 2 couples from taiwan as they wanted to get the blessings for a child. Monk in the monastery gave the blessings to the pictures. Our guide told us the story about the madman and how the temple was made. Apparently the madman monk was famous for his aggressive lifestyle where he would drink and keep company of women. There is a stupa in the temple which signifies madman subduing a demon. His half brother later built the temple. 


After the temple we had lunch at the chimi lhakhang cafe. We finally tasted the ema datshi (chilli cheese). It was only worth tasting.


After lunch we went to see the Punakha Dzong. On the way we also took a walk on the suspension bridge which connects parts of Punakha. Punakha Dzong (fort) is huge and has a monastery/temple along with government offices. As per our guide one of the monk died and later his body shrunk and started emitting incense and is still kept in one of the buildings. Visitors are not allowed entry in that building.


After visiting dzong we headed for another hike to the Khamsum Yulley Namgyal Chorten (temple). The hike was great and with a bit of elevation. We walked along the farms of locals. Crops had already been harvested so there wasn’t any greenery in the farms but the views were still great. In-between we had to give way to the donkeys of the farmers which they use to carry heavy stuff to their homes. This temple was built for the current king by the queen mother as suggested by the astrologer for the wellness of Bhutan. This temple is for the energy buddha - the terrifying form of buddha. The views of the valley from the temple top were amazing. After a quick look at the temple deities, we hiked down back. From there we headed straight to the hotel - demchen resort. 


We had dinner at a bhutanese restaurant today. Food was mostly bhutanese - rice, lentil soup, butter tea, momos, dry vegetable and a special dish which was cheese and ghee. Apparently that is only made when special guests come.

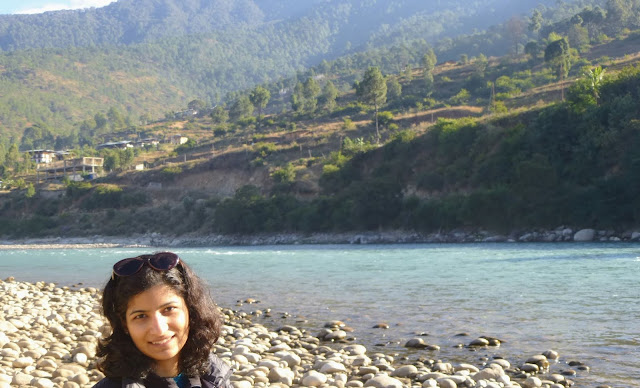


Day 3:
Today we started at 9am from the hotel after the breakfast. We headed back towards Thimphu. In between we stopped at Dochula pass to take pictures of the himalayan mountain range. We had tea and biscuits sitting outside with a view of the himalayas and the 108 stupas on the other side of the road. Majestic views and somewhat similar to the hills of Uttarakhand in India. After this we went straight to Thimphu. In between we saw monks convoy which was heading from Thimphu to Punakha for the winter as Punakha is less cold than Thimphu. Punakha is the winter capital for monks where they will stay till April now. Bhutanese locals were standing in a line by the side of the road waiting for the monks convoy to get the blessings from the head of the monks.


After reaching Thimphu, we first stopped by the Takin (national animal of Bhutan) reserve to see the Takin. It looks like a goat from the head and an ox with the body and claws. As per the folklore, Takin was created by the buddha that brought buddhism in bhutan.


After seeing Takins, we came to the hotel for checkin and lunch. We started again at 1:45pm to visit the National folk history museum. The museum shows a typical house in a bhutanese village. It was a lot similar with our old houses in the uttarakhand village. There were multiple storeys with each having its own use - ground floor for cattle, first floor for food and grain storage and second floor for kitchen and sleeping room. 


From here we went to see the national library. This library has a lot of scriptures.


While returning from the library we saw Bhutan's royal buildings where the king resides.


From there we went to see the tallest buddha statue on top the mountain. This was 182ft statue of buddha. Inside were lovely. The views from outside gave a good view of the Thimphu town. 


Day 4:
Today we started at 8:30am after breakfast from hotel for the tango monastery which was 9-10 km from Thimphu. The drive was very beautiful as we got out of the city. Once we reached the monastery which was in between the pine trees, we immediately started hiking up the paved path to reach the temple. It took us 45 min to reach up. Views from the hike were awesome as it was early morning and we were on a higher elevation. There was one another group hiking at the same time.


Once we reached the temple out guide told us the story of one of the paintings where one of the person who committed gross crime in his life was able to achieve enlightenment in the same life. The temple inside had a special small temple of past, present and future buddha and it's said that if you ask for something there you get it. We sat inside the main temple hall for some time. There was a family also sitting and chanting mantras in dzongkha. We then went to see another temple at the back which also had a community hall where some monks were studying buddhist books. This monastery was founded long back by someone who has reincarnated again. A small boy of 7 yrs who had founded this monastery in his previous life went to the king and asked him about why he shaved off his beard (apparently they knew each other in previous life). Today this boy who is now around 10-15 yrs is the chief abbot of this monastery and his picture was placed at the seat of chief Abbot as is usually the case in all temples. It was hard to believe but then seeing that boy's picture there and in one other major monastery (taktsang) it felt like reincarnation is a reasonable belief. There was one other temple with a rock with head of the horse but we skipped that. I guess we didn't want to climb more stairs. Our guide told that all main saints who meditated here long back at this monastery saw the head of the horse in their mind so this temple has got significance here. 


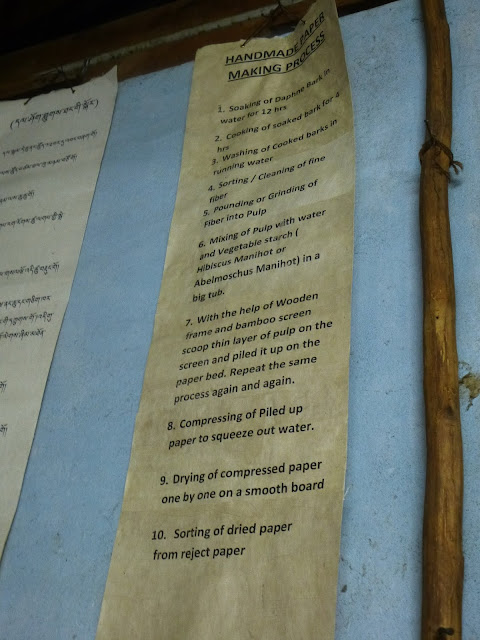
We then came down and headed towards the town to have lunch. We had lunch at a hotel in the main town area. We ordered hot and sour soup which turned out to be a disaster. After few sips of the hot soup we gave up. The rest of the food - fulka, daal and aloo jeera was good. After lunch we strolled in the market before heading to the craft school which was unfortunately closed . We then visited textile museum and saw textiles of bhutan. They still wear clothes (gho and kira) weaved locally. After the museum we went to the handmade paper factory which makes paper from the bark of a tree. It was awesome to see how the tree bark can transform into something so nice. The souvenirs made of paper were quite expensive so we skipped buying. The lampshade was quite nice. 


After that we went to the craft bazaar. It was a long street of shops owned by locals which were selling handmade crafts. We bought a thangka with the 8 auspicious symbols of bhutan. I also liked the handmade bags made out of wool. This was end of day 4. 


Day 5:
Looks like I did not write about this day in my trip diary 2 year back. I think its clear why as the experience itself was so great that I took the time to soak into it later in the day as well. This was our last day in the trip before we head back to India. It was an important day as we were about to visit the Tigers Nest or the Taktsang Monastery near Paro. It's very famous and such a mesmerizing hike. I enjoyed the hike even though it wasn't easy. I really enjoyed all the views along the hike and the excitement of seeing the hanging monastery from far. That night we just relaxed as the hike was intense. We stayed in Paro that night and took a flight back to Delhi next morning. 


I must thank my brother for constantly nagging me to write my trip experience in a blog.

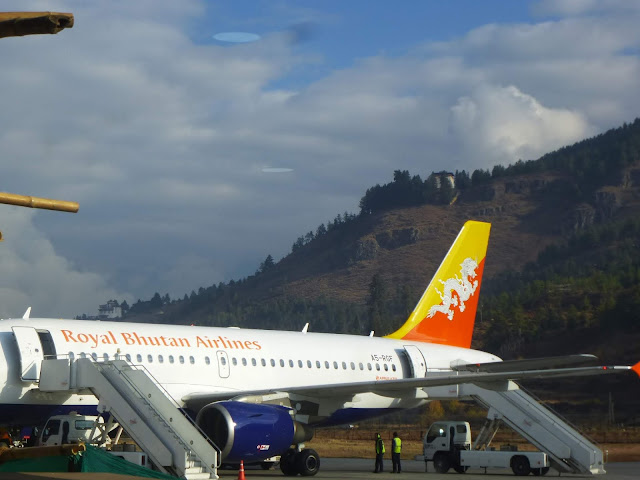
Royal Bhutan Airlines plane that we took. It was a great flight with wonderful views of Himalayas. The airline provided us great food onboard. This was one flight where everyone wanted a window seat!


Until next time....

Tuesday, February 9, 2016

Nani ko Shradhaanjali

Feb 9, 2016

नानी जी को श्रद्धांजलि

वर्ष २०१६ मौनी अमावस्या को
ले लिया तुमने मौन अनंत
आज तुम्हारे जाने पर
ये मन है थोड़ा खिन्न
शब्दों में ही लिखकर
अब करे याद ये तुमको।

थी गहन आवाज़ तुम्हारी कितनी
सबको करती अनुशासित
सब सोचे था वो कड़कपन
पर हमने देखा चिंता और प्यार।

केश तुम्हारे थे काले कितने
वृद्धावस्था ने भी घुटने टेके थे
सारे नाती पोते भी करते थे
मन ही मन में गर्व उन पर।

पूजा पाठ में ध्यान था कितना
करतीं सबके सुख की कामना
कितनी भी कठिनाई आयीं
पर हार कभी ना तुमने मानी।

इस जीवन में तुम अपने
काम अनेक कर गयीं
मुझको तो बड़े उपहार में
माँ तुम मेरी दे गयीं।

पर अपने ही हंसालय से
तुम आज विदा क्यों ले गयीं?

Monday, January 19, 2015

Gobhi Parathe

Long weekend (Thanks to Martin Luther King) had been going great, with a lot of sleeping. I am not sure when I am going to get out of the jet lag mode. The cold weather acts like a catalyst to the sleep! Yesterday was the day when I cooked all meals. Wanted to avoid eating leftovers from lunch in dinner and thus the paratha plan. I have never made gobhi parathe myself so a trial was the plan. They turned out to be great (my expectations from myself were pretty low today).


Here is my recipe which is mostly similar to the several others available online:

Ingredients:

  1. Wheat flour
  2. Oil
  3. Water
  4. Cauliflower 
  5. Salt
  6. Garam Masala
  7. Green chili
  8. Coriander leaves (I forgot to add these but you shouldn't)
  9. Ginger
  10. Amchur (mango) powder


Preparation:

  1. Mix 1/2-1 teaspoon of oil (I use olive oil for almost everything in cooking) in the flour and some salt (as per taste) and make the dough (I usually use hot water) and set it aside.
  2. Wash cauliflower and heat the flowers in microwave for 2-3 minutes to make them soft.
  3. Grate the cauliflower and add finely chopped green chili and chopped/grated ginger.
  4. Add salt, garam masala and mango powder. Add finely chopped coriander leaves as well.
  5. Take 2 small balls of dough. Roll them each to about 3-4" diameter. 
  6. Add the stuffing on top of one and place the other on top of this. 
  7. Make sure to seal all around it. Roll and make it bigger based on your thickness preference.
  8. Roast the paratha with oil on a pan. Ready to serve with anything you prefer. I like curd with paratha. You could also add some butter on top of the paratha but I am not a big fan of adding more calories on top of calorie heavy food on a lazy weekend.


Sunday, January 18, 2015

Single Bed Quilt

Yet another bed quilt! This post has been in draft since almost a month. Made this quilt last year in November. The plan was to utilize all the scraps and make a quilt out of it. I used some of the old scraps along with new cloth. Since I haven't learnt free motion quilting yet, this quilt also had to do with the stitch-in-the-ditch quilting. I took it to India and now Mom has kept it for our home there. I had bought all material from Walmart. 

Some stats: (I modified the dimensions in between and did not keep track of all of them). 

Desired finished size:
50" * 90"        

Blocks:
8 * 17     
                     
Block size:
5.5" * 5.5" (finished)

Each block needs:
  • 1, 5.5" * 5.5" piece of white/light fabric.
  • 2, 3" * 3" pieces of colored fabric.
I bought these fat quarters to use for colored squares.


This is how I made a single block:
Sew the 2 small squares (placed wrong side up) on top of the big square (placed right side up) as shown in the pic on the right below. Then cut the triangle (as shown) leaving a 1/4" seam allowance.


Note that you will waste triangles with this but then those are very small and probably can be used for other purpose but this makes it a lot easier and quick to make so many of these blocks that are needed.

Sunday, November 30, 2014

Pahadi Raita

Pahad means 'hill' in Hindi and this raita recipe comes from the hills of Indian state Uttarakhand - my native. This is made in almost every festival in our homes and people love it in variety of tastes. Every time I taste Wasabi I get reminded of this raita. Even though I don't like cucumber, I like this raita. You would be surprised to know that there are specific small restaurants run by locals when you travel to Kumaon hills which are specifically famous for delicious raita and Aloo-ke-gutke.

Yesterday was a lazy day for me. I ended up making Kichdi for lunch and then remembered the saying: 'Kichdi ke chaar yaar, dahi, mooli, ghee, achaar' (4 sides are good to enjoy kichdi - yogurt, raddish, ghee, pickle). Luckily I had a cucumber so I made the raita in no time. Absolutely enjoyed the lunch.

I need to learn food photography!


Ingredients:

  1. Cucumber
  2. Yogurt
  3. Mustard seeds
  4. Salt
  5. Green chili
  6. Turmeric
  7. Coriander leaves
  8. Water
Preparation:
  1. Soak mustard seeds ( yellow or black both will do). with little water and grind it to make fine paste. Keep it aside.
  2. Peel cucumber and remove the seeds from inside.
  3. Beat yogurt in a bowl and keep it aside.
  4. Grate cucumber, squeeze all water from grated cucumber and add it (cucumber) to the yogurt. 
  5. Add turmeric, finely chopped green chili, red chili powder and salt to this.
  6. Add the mustard paste to it. Start by adding in small quantity as it takes about 30-60 min for the mustard flavor to rise.
  7. Add chopped coriander on top.

Sunday, September 28, 2014

Matar Paneer

Back after long time. No, no, I didn't stop cooking. I just could not post everything. Made stuffed eggplant (bharva baigan) and egg kadhi (yes kadhi!) recently. I also bought a nutribullet recently and trying different smoothies these days. Thanks to the friend who encouraged to not buy a juicer and instead get nutribullet.

So the lazy sunday started with a big glass of smoothie and then I was so full that I avoided eating anything else. 11am ginger tea is a must have on weekends for this tea addict but the worse effect of tea on me is that it makes me full for another hour or two. So I go in the kitchen at 12pm and find this paneer in the fridge. I had to finish this paneer if I really wanted to avoid letting it go in the trash can next week (ya the next full fledged cooking will be only next weekend). Somehow the paneer reminded me of the so called 'vegetable and paneer biryani' in office cafe. The irony is that most of the time there is no paneer in it and only potatoes in the name of vegetable. the other day I was thinking that they should just cook biryani and keep paneer cubes separately and just put one in everyone's plate. So here is the recipe for matar paneer. Nothing fancy or special.


Ingredients:
1. Paneer
2. Tomatoes - 2 (I had put 1.5 medium size tomatoes).
3. Onion (I used very less)
4. Ginger
5. Green chilli. 
6. Oil
7. Coriander powder
8. Turmeric powder
9. Garam masala
10. Salt, Jeera, fresh coriander leaves.

Preparation:
1. Cut onion and tomatoes. 
2. Toss onion, 1/2 inch cube of ginger and green chilli into oil and fry it till the onions are brown. Add tomatoes and let them turn soft.
3. Put the above in a blender and blend it into smooth paste.
4. Heat 1tsp oil and add jeera (and heeng) to it. 
5. Add the onion-tomato paste to it. 
6. and add water as needed.
7. Now add turmeric powder, coriander powder and garam masala (as per your taste).
8. Add green peas and paneer cubes to it. 
9. Add salt.
10. Let it simmer for 5 minutes. Garnish with coriander leaves.

Wednesday, April 2, 2014

Bed Cover with Matching Pillowcases

This is the first quilting project which is going to remain with me. I sent all others as gifts to family and friends. Yes, I made this for my bed and happily sleeping on it since then. 


I picked 5 patterns. I bought them all from joann. I have to say that fabric at joann is expensive and there is a chance that you may not get the same pattern if you want more of it later, which happened with me and thats why the patchwork on the panel. The design is simple. It took 2 days to complete it. 

The number of blocks of each pattern are:
1: 24
2: 24
3: 23
4: 22
5: 27

and the yardage is:

1: ⅞ yd (24)
2: ⅞ yd (24)
3: border + 23 blocks: 2yd
4: ⅞ yd 22 blocks + binding
5: 1 yd (27)

Batting: 2 yd (fabric 90 inch width)
Backing: 5 yd

Backing and batting were bought from walmart. I was already a bit terrified by the amount I had spent on the other fabric from joann that I just bought the cheapest fabric for backing :) By now the lady who cuts the fabric at walmart recognizes me. She asks me what I am making every time I buy stuff there. 

Finished size: 72" * 90"
Pillowcase size: 19" * 25"

Block size: 7" * 7"
10 blocks across the width and 12 blocks across height. 

The total cost of came to around $65. A bit expensive and I love it on my bed!

I never knew making pillowcases can be that easy. For the size I mentioned, I had to cut 3 pieces:
20” * 26” , 20” * 15” , 20” * 15”. 2 of them are for the back and the bigger one is for the front. I searched for tutorials online (pillowcase with envelope). This one also looks good.

I met someone at work after the meditation session who had a quilt with them and we just started talking. After our talk, I was told that the combination of engineering, quilting and meditation sounds perfect on me and I had to say that I love all of them :) I guess I need to get back to my engineering side now. I will be back with more stuff in few months.

Sunday, March 23, 2014

Another Baby Quilt


I made this quilt for a friend's baby shower. I finished this long back but hadn't got time to update the blog and also I wanted to ship it before I post it on my blog. 

I picked a simple design for this quilt. Each completed block is about 6". When I started making it, I actually didn't know whether the owner of this quilt will be a baby girl or a boy. I didn't want to make a pink quilt so I picked other colors. Usually girls can adjust with blue colors too but I doubt if pink is enjoyed by boys. Though babies don't care about it at all but still :) I picked total 10 patterns. 5 of them for the inner block of the 6" block. Other 5 for the outer part of each block. 

Below is the pic which shows the measurements of the pieces I had to cut. Each block consists of 5 pieces. Note that I have not shown all the pieces of a block in the pic below. You need 2 of those in blue of each size. 
Mid square: 3.5” * 3.5”
Boundary strips: 3.5” * 2” and 6.5” * 2”


The organization of the blocks is shown in the pic above. Its simple, 25 blocks as organized above and stitched together with 1/4" seam allowance. I use this website for calculating yardage for the fabric needed. For this quilt I had some fabric which was already available and some I bought so you will have to do the yardage calculation yourself. 


 Above is one of the pics of the finished quilt and another one of me trying to pack it to send it to the other coast of US. I hope the new parents will like it.


Thursday, November 28, 2013

Baby Quilt

This was my second project. The plan was to make this first but then I decided to make some quilted coasters as for practice and of course getting that confidence again that I can get back to using a sewing machine after all these years.


Design:
I came across this design online along with basic tutorial.

Materials:
Along with the basic tools (scissors, quilting pins, cutting board, rotary cutter, ruler) and sewing machine I used the following:

Top: I bought a fat quarter (18" * 22") bundle which had 8 different fat quarters and 1.5 yds of cream fabric for borders and in between columns.

Backing: 1.5 yds light brown print fabric. Some of the fat quarters had brown shades so it made sense to get some light shade of brown.

Binding: 0.5 yds of dark brown print fabric.

Batting: 44" * 55" batting. You should decide on the loft based on your needs. I used an extra-loft poly-fill batting. Cotton might be easier to quilt.

Note: Seam allowance for all stitches is 1/4".

Prepare Top: 
  1. Cut 2.5" * 5" pieces out of fat quarters for the print strips. Join 22 of these to form one strip. You can decide on the order of various prints according to your own taste of colors. Make 5 such strips.
  2. Iron on the back seams to fold them all in same direction. Measure the length of the strip and say its L1.
  3. Cut 6 strips of the cream fabric (cut along lengthwise grain) each of L1" * 3.5".
  4. Join the cream strips and the printed strips in alternate order. 
  5. Iron on the back of the joined fabric and move all seams towards the dark fabric side.
  6. Measure the width of this fabric and say its L2.
  7. Cut 2 strips (cut along the crosswise grain) each of L2 * 3.5".
  8. Join these strips on top and bottom of the unfinished top.
Your top is ready now. Measure the length and width of the finished top after ironing the seams on the back. Say its L" * W".

Prepare Back:
I also used a strip of printed fabric from the top to create a strip at the back. Its optional though.
To decide on how many 2.5" * 5" pieces I need to stitch together to make it fit in the back width, I did the math: x * 2.5 - (x-1) * ¼ = W + 3. Cut 'x' number of 2.5" * 5" pieces and stitch them together. Cut 2 pieces of backing fabric as:
20" * W + 3"
(L - 4.5 - 17)" * W + 3"  [Note: we have added an extra 3" in length and width]
Join all 3 pieces of fabric in order (2 cut pieces with the top fabric strip in between).
Iron on the seams and over the complete fabric back. The back is also ready.

Prepare Quilt Sandwich:
You now need to prepare the quilt sandwich to quilt it. Lay the backing with wrong side up on a flat surface/floor. Lay out the batting on top of it by making sure that the back doesn't move or form folds. Finally place the top on top of batting. Usually you use some kind of spray adhesive to make the batting stick to the backing. I did not use anything. I just used lots of pins all over to keep the 3 layers intact.
Now its time to quilt all over so that the three layers are stabilized and also to make sure the batting won't move when the quilt is washed. I mainly used stitch-in-the-ditch all over. I am yet to get used to free-motion quilting. Will try on something smaller.


Add Binding:
Once the quilt is done, its time to attach binding to the sides of the quilt.

Binding:
5 strips cut cross grain of 2.5” each
½ yard


Sunday, November 10, 2013

Dining Table Runner

Finally I got some time to write this long pending tutorial. Just as a note, this will probably not be the best as I forgot to take pictures in between while making it. Still it will give overall idea of what I did.

Fig 1. Complete runner
As usual this is a quilt which means it has 3 layers: Top, Batting and Backing which are then quilted to hold it together and then bound together with the binding. 

Design: 
I don't remember where I saw this design so I am not going to put any link here. I wanted to make table runner of size 40" * 15".

Materials: 
Basic tools: scissors, quilting pins, cutting board, rotary cutter, ruler and sewing machine.

Note: Seam allowance for all stitches is 1/4"
Top:
If you look at the picture above, you can see that that top is composed of 3 big blocks and the surrounding layer of small blocks. I made the inner blocks first and then attached the boundary strips of smaller blocks. To make one block:

Take 8, 3" * 3" of each of the 2 contrast color prints fabric. These will form 16, 3"*3" squares as shown in Fig. 5. The way its done is by taking 1 piece of each color and put the right sides together and then draw a line with a pencil/pen diagonal as shown in Fig 3. Stitch straight on either side of this line leaving 1/4" seam allowance as shown in Fig. 4. Once you are done will all 16 square pairs, cut on the line you had drawn earlier. Press/iron the seams an usual. You will end up with 16 squares similar to Fig. 5.

Fig. 2
Fig. 3
Fig. 4


Fig. 5
The next step is to join these squares and form a nice big square block as shown in Fig. 7. Combine squares to form rows first and then combine these to form the complete block. I think I ended up with 8.5" * 8.5" block.
Fig. 6


Fig. 7
The next thing I did was cut 4, 2" * 11" strips of off white cloth. Attach these strips as boundary to the above block. You want to attach them such that the strip starts at one corner of the block and continues beyond the end on that side. It may be more clear in Fig. 9. Once you have all 3 blocks finished, its time to make the strips to combine these. I used some leftover fabric to make these. I think I used 5-6 pattern fabrics to make them. I don't remember how big I cut the squares to combine them to form a strip but you can measure the completed block above and based on that, cut smaller square blocks to form a strip to attach to its 2 sides. You need to make 4 such strips so that you can attach all 3 blocks above. Once that is done, you need to make 2 longer strips for the complete length of the runner. Attach these to complete the top as shown below.
Fig. 8

Fig. 9

Batting: For this table runner, I used cotton batting which is easy to quilt with. Everything was bought from Walmart and is super cheap.

Backing: I used the light print from the center blocks as backing. Again, I forgot to take a picture of the back. Remember to cut the batting and backing 1" extra than the top on all sides.

I used stitch-in-the-ditch for quilting. Once the quilting is done, add binding. I used the darker fabric from the center block for binding.

Fig. 10

Saturday, October 5, 2013

Quilted Waterproof Coasters


Some of my friends requested to post a tutorial on how to make these quilted coasters out of fabric scraps. So here is a quick tutorial on how to make your own. This one is a simple one with the front and back piece made out a single piece but you can try different layouts with multiple pieces.
Happy Quilting! 


Cut 2, 4.5" * 4.5" pieces for front and back of the coaster.


Put the right sides of the front and back pieces together and sew around the corner with 1/4 " seam allowance on 3 sides and partially on the 4th side. The best way to do it is to start 1/4 off one of the corners and finish 1/4 off the other corner on the same side. 


Cut a 4" * 4" piece of fusible fleece as the batting in between.


 Put the batting the with the glue on one side of the sewn pieces. Iron on to fuse them together.


 Imp: Cut the corners of the piece now so that they are rounded.


Turn the right side of the fabric outside from the side that's partially sewn.


Iron on the open side to turn the ends of the fabric pieces inside the opening and prepare it for sewing.


Use any stitch to quilt the coaster.


I used iron-on-vinyl which I bought from walmart for laminating the coasters to make them waterproof. I found the stuff a lot cheaper at walmart than Joann. Iron-on-vinyl is easy to use. You just need to take out the lamination from the backing paper and put it on top of the fabric. Put the backing paper on top and iron on to fuse.


Here are how they look when complete.The last picture shows the complete set I made. It has 6 in it. 


Sunday, July 21, 2013

Thai curry

I have changed my routine where I only cook on weekends now. A weekend trip to the produce market is sometimes a feeling like it might be for a kid to go to a toy store. I decided that every weekend I will try to get some ingredient which I have never used before. This time I got habanero peppers. Along with that I picked up mushrooms, bell peppers and string beans. So I decide to make Thai curry with coconut milk. I head to the indian store and picked a can of coconut milk. Here is my recipe:

Thai curry

Ingredients:
  1. Coconut milk - 1 can
  2. Red and green bell pepper - 1 each
  3. String beans - 6-7 beans
  4. White mushrooms - 5-6
  5. Tomatoes
  6. Green onion - 1/2 bunch
  7. Firm tofu - 2 inch cube
  8. Spices - turmeric, coriander powder
  9. Green chillies - 1-2
  10. Mint leaves - 7-8
  11. Coriander leaves
  12. Lemon juice - 3 tsp. spoons
  13. Olive oil - 1 tbsp. spoons
  14. Cumin and mustard seeds
  15. Ginger and garlic
Preparation:
  1. Cut vegetables into pieces. Cut the bell peppers along their length.
  2. Make puree out of mint and coriander leaves
  3. Heat oil in a pan
  4. Put cumin and mustard seeds
  5. Now put long cut green chilli, small cut ginger and garlic. I also added few small cut pieces of habanero pepper. (Caution: use only small amount of habanero pepper. Its super hot)
  6. Let the ginger garlic be light brown
  7. Now add the small cut green onion and fry them for a minute
  8. Add cut tomatoes
  9. Add all the cut vegetables and mix well
  10. Add turmeric and coriander powder
  11. Add salt
  12. Now add the mint and coriander puree
  13. Add the lemon juice and mix everything well
  14. Add 1/4 to 1/2 can of coconut milk
  15. Add cubes of cut tofu and let it simmer for 5-10 minutes
Serve hot with rice. I got some rum cake as well and it went well as a desert after the thai lunch.


Featured Post

Kumaon Part 7 - Kausani - Baijnath - Apr 2023

April 30, 2023 See the other parts of this journey - part 1 , part 2 , part 3 , part 4 , part 5 ,  part 6 .  From our native village we went...